JXA offers some basic functions to pass information to users and to request data from them. Those are
displayAlertto inform the user about a conditiondisplayNotificationto display a message using the notification centerdisplayDialogto ask for user inputchooseFileto let the user choose an existing filechooseFolderto let the user choose a folderchooseFileNameto let the user specify a file name that need not exist yet, e.g. for saving a documentchooseFromListto let the user choose from a pre-defined list of alternatives- the global object
Progressto display a progress indicator for a longer running task
As you can see, the possibilities are quite limited – there are not check boxes or radio buttons and no possibility to build your own dialogs. Also you have to take care of the different return types of the methods.
Common requirements for all dialogs#
As mentioned before, interaction with the user requires the standard additions. A reliable way to do so is
const app = Application.currentApplication();
app.includeStandardAdditions = true;You can use any application you want, it need not be currentApplication().
If the dialog contains buttons, you’ll have to pass their labels in an array called buttons. All dialogs requesting input from the user will return the label of the button clicked, some will return additional information like a file selected.
You have to designate one button as cancelButton by specifying either its label or its number. However, if the user clicks this button, an error will be generated – your code will usually not be able to check which button was clicked.
You should use a try ... catch block to catch this error (number -128). The details of this are described here.
Displaying alerts#
The method displayAlert permits you to show a simple informational box to the user like so:
const returnValue = app.displayAlert(
"File not found", {
message: "The file you specified does not exist.",
as: "critical",
buttons: ["Stop", "Continue"],
defaultButton: "Continue",
cancelButton: "Stop"
});Here, the first string passed is displayed in bold text as the first line in the dialog box. Below that, the alertMessage is displayed in normal text. So you’d use alertText to give general information and convey more details in the messageText. The as property can be “critical”, “informational” or “warning”; it defines the icon shown in the dialog box. In buttons, you can pass up to three strings that are used as the labels for buttons. defaultButton and cancelButton are the buttons displayed as the default choice and used to cancel the dialog, respectively.
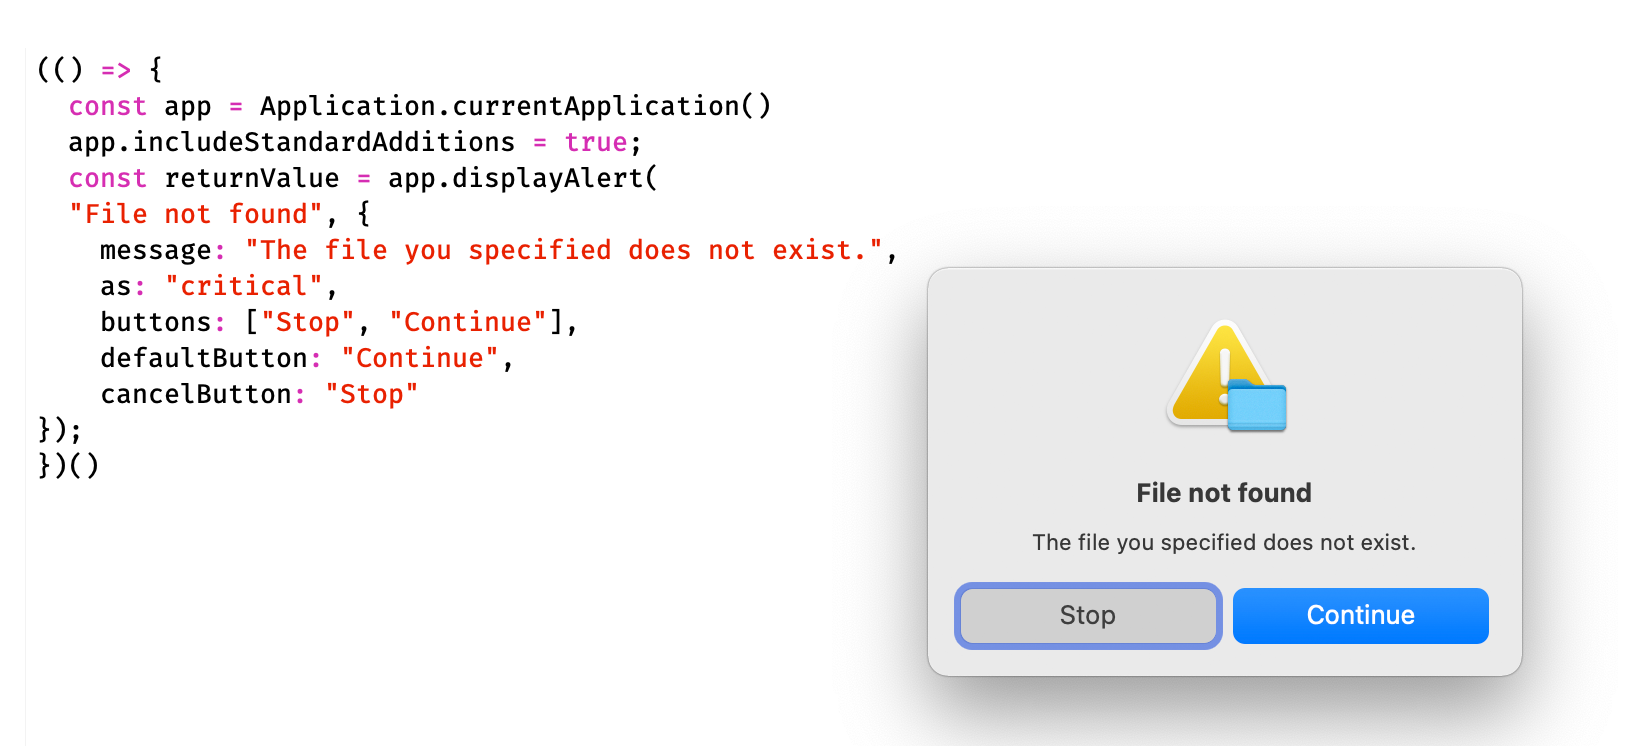
This method returns an AlertReply object with the property buttonReturned, containing the string label of the button the user clicked.
Handling cancellation#
As mentioned before, you’ll usually not be able to inspect the return value of displayAlert if the user closed the dialog by clicking the cancelButton since the runtime environment raises error -128 in this case. If you do not want to irritate the user with just another error message (and quite a pointless one), you should ignore it like so
try {
const returnValue = app.displayDialog(…);
} catch (error) {
if (error.errorNumber !== -128) {
throw(error.errorMessage);
}
}This try…catch block ignores error -128 and passes all other error messages to he user. Notice that here returnValue will be available only inside the try block. If you need it outside of this block, you should declare it with let just before the try block.
Displaying notifications#
A notification is shown in the operating system’s notification center. How it appears there depends on the user’s settings, so you have very little influence. You can define a sound to be played along with the notification, but again: if the user has decided to turn off sound for notifications, they’ll not hear it. Notifications do not permit for user interaction.
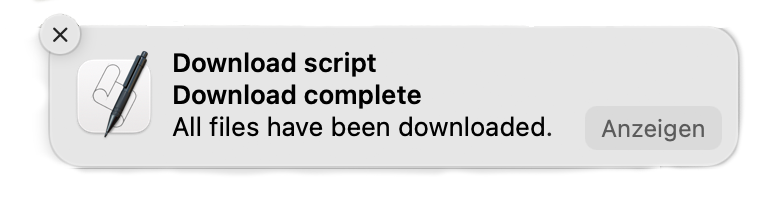
app.displayNotification("All files have been downloaded.", {
withTitle: "Download script",
subtitle: "Download complete",
soundName: "Frog"
})The first parameter for displayNotification is the most informative string. withTitle should tell the user which program produced the notification, and subtitle should give some detail. With soundName, you can specify one of the pre-defined system sounds to play.
Ask for textual user input#
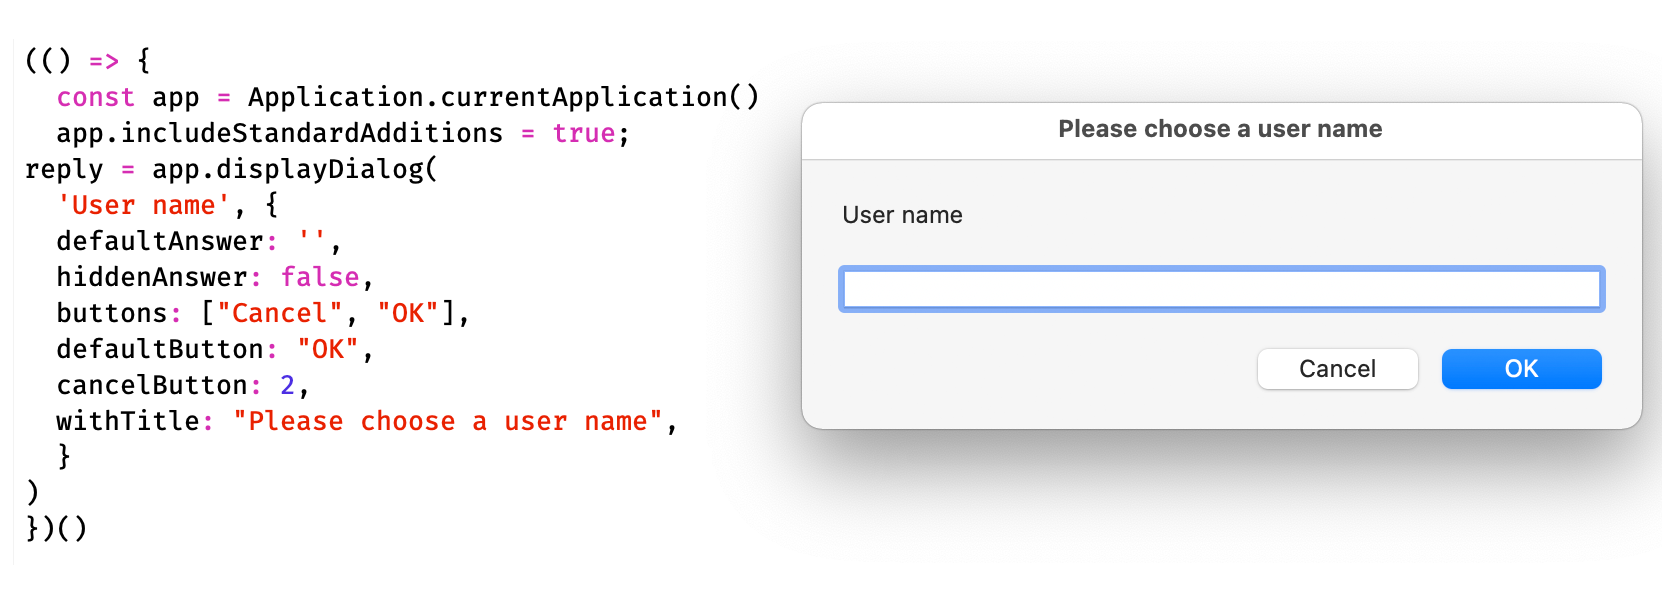
If you need textual input like a person’s name or their date of birth, you can use displayDialog.
reply = app.displayDialog(
'User name', {
defaultAnswer: '',
hiddenAnswer: false,
buttons: ["Cancel", "OK"],
defaultButton: "OK",
cancelButton: 2,
withTitle: "Please choose a user name",
}
)This method returns a DialogReply object with the properties buttonReturned and textReturned. The first is the label of the button the user clicked, the second one the text from the input field. As you can see, this dialog is quite limited: You can’t force the user to only enter numbers or a date or even restrict their input in any way at all. So you must verify that the user input conforms to your requirements before doing anything with it.
Let the user choose a file or a folder#
You can have users select an existing file with chooseFile:
const pictures = app.chooseFile({
withPrompt: "Please the photos to rotate:",
ofType: ["jpeg", "jpg"],
multipleSelectionsAllowed: true,
defaultLocation: Path("/Users/.../Fertig"),
})Here, withPrompt is the message appearing in the file selector window’s title. With ofType you can specify an array of permitted file types. Here, it uses file extensions, but you can also use Universal Type Identifiers (UTI) like “public.image”. For a list of available UTIs, you should turn to your favorite search engine. In many situations, they are preferable over file extensions – like here, were providing a comprehensive list of extensions for image files might require a lot of typing. Use the boolean multipleSelection to specify if the user may select more than one file. The defaultLocation is a Path object specifying a folder to present to the user when the dialog appears.

The file selector dialog returns an array of strings, which are the complete paths to the files the user selected. If the user aborts the dialog, this list will be undefined.
To let the user choose a folder, use chooseFolder like so:
const folders = app.chooseFolder({
withPrompt: "Please the folders to delete:",
multipleSelectionsAllowed: true,
defaultLocation: "/Users/…Downloads"
})The properties of the object passed to this method have the same meaning as for chooseFile. Similarly, the method returns a list of folder paths. If the user aborts the dialog, this list will be undefined.
Let the user specify a (new) file name#
While chooseFile permits users to select an existing file, chooseFileName is used to specify the name of a file that need not exist. It is thus suited to have the user decide on a file name for saving a document. If the chosen name already exists, the dialog will let the user know and they can then decide to overwrite the existing file or abort the action. If chooseFileName returns a path, the application can write to it.
const targetFile = app.chooseFileName({
withPrompt: "Please select a name for the document:",
defaultName: "Document1"
defaultLocation: Path("/Users/.../Fertig"),
})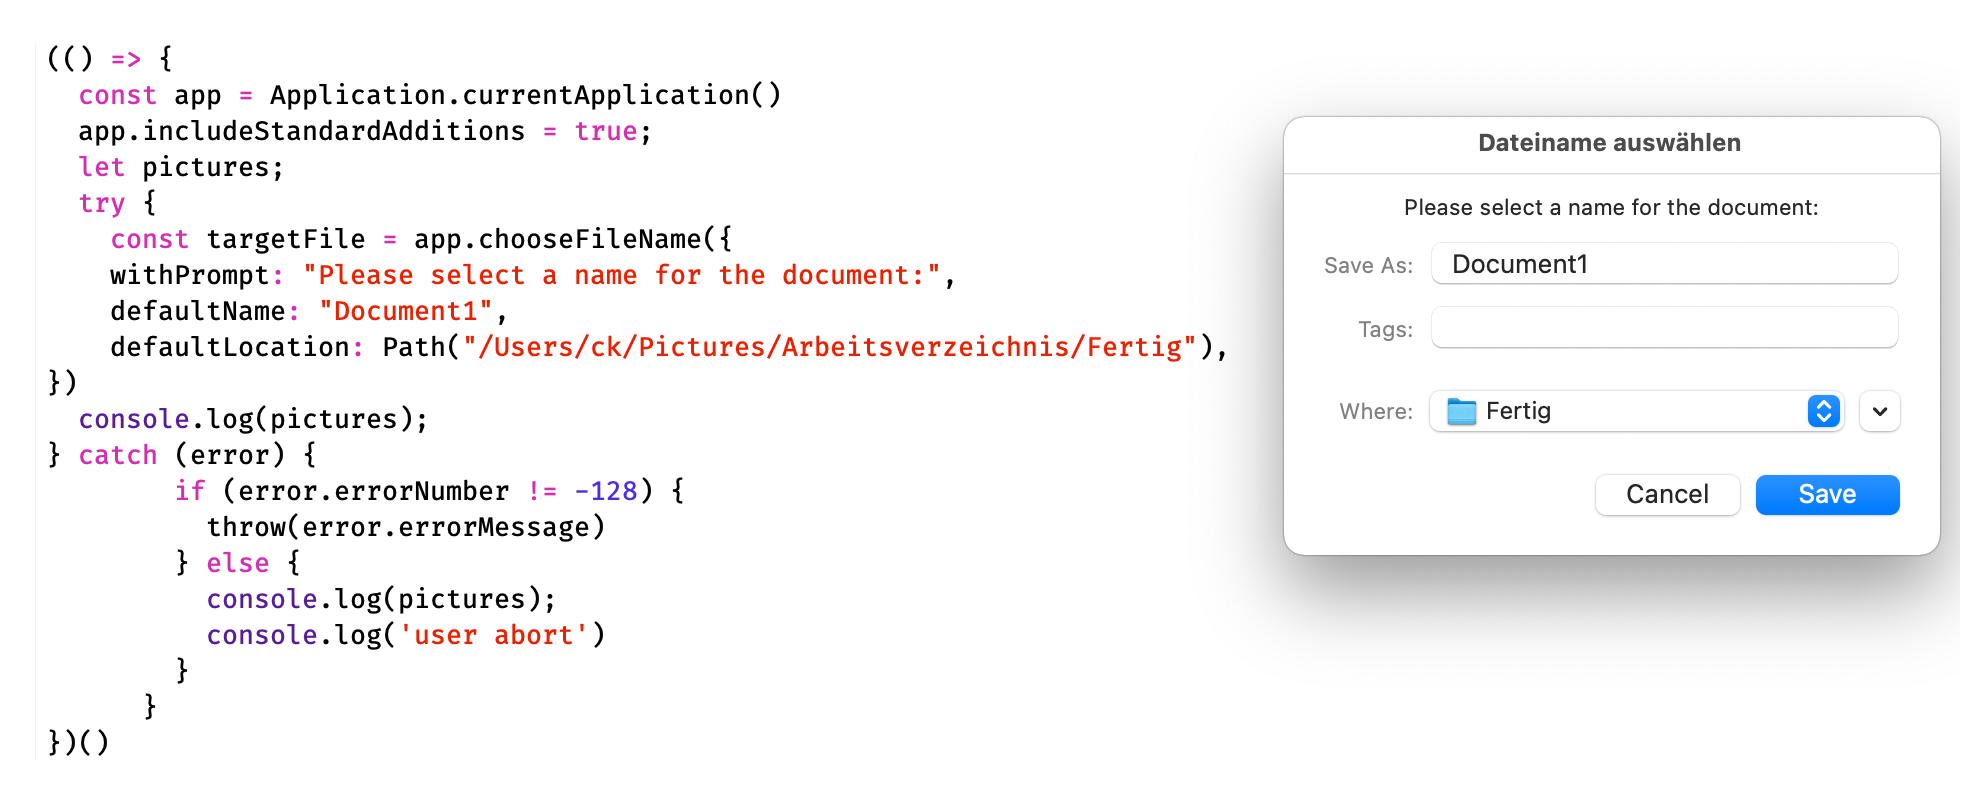
As you can see in the screenshot, the localization of this dialog is kind of poor. The runtime environment adds a title to the dialog according to the system wide language preference, whereas the labels for the “Save” and “Cancel” buttons depend on the language of the application running the script (which is osascriptin this case).
Let the user choose from a list#
Although there is no provision for check boxes or radio boxes in JXA directly, you can kind of simulate them with chooseFromList. This method presents a predefined list of choices to the user and allows them to chose one, several or none of these items, depending on the parameters passed to the method.
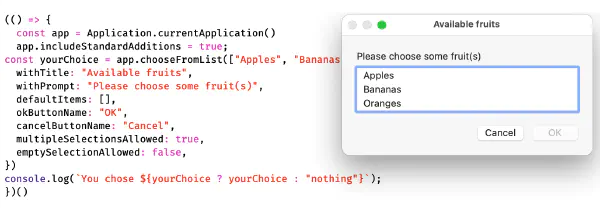
yourChoice = app.chooseFromList(["Apples", "Bananas", "Oranges"], {
withTitle: "Available fruits",
withPrompt: "Please choose some fruit(s)",
defaultItems: [],
okButtonName: "OK",
cancelButtonName: "Cancel",
multipleSelectionsAllowed: true,
emptySelectionAllowed: false,
})chooseFromList returns the list of items selected by the user or false if they canceled the dialog. You can pass a list of pre-selected items in defaultItems; multipleSelectionsAllowed permits the user to select more than one item if it is set to true. If the user may close the dialog without selecting anything, set emptySelectionsAllowed to true.

chooseFromListis the only UI method that does not throw error -128 if the user clicks the “Cancel” button. So you do not need to wrap it into atry…catchblock but can simply test the return value likeif (selectedItems)… else ….
Indicating progress for lengthy tasks#
If a scripting task is possibly taking a greater amount of time, you should let the user follow its progress. In order to do so, you have to use the global object Progress with its properties
totalUnitCount: the total number of items to processcompletedUnitCount: the number of items already processeddescription: A short text to let the user know what the script is doingadditionalDescription: A text that can inform about the current state
Suppose you’ve written a JXA function to copy files from one folder to another, then you might provide a progress indicator like so:
function copyListOfFiles(list, target) {
const total = list.length;
Progress.totalUnitCount = total;
Progress.completedUnitCount = 0;
Progress.description = 'Copying files ...';
Progress.additionalDescription = 'Preparing to copy.';
let i = 0;
list.forEach(file => {
copySingleFile(f, target);
Progress.completedUnitCount = i;
Progress.additionalDescription = `Copied file ${i} of ${total}`;
})
}How progress is reported, depends on the environment the script is run in. In Script Editor, progress is announced in the bottom of the window. For scripts run from the system wide script menu, the progress indicator appears as a gear symbol in the menu bar. All other environments will show a dialog with a “Stop” button. If the user clicks on it, error -128 will be generated and processing stops.